Category Archives: Taranis

Finding a lost model with Taranis ( or other ) Telemetry

Some time ago Bruce Simpson of RC model Reviews mentioned using the Taranis Telemetry to find a lost model. I have used it several times lately so thought I would pass on this tip.

The idea is that the lowest signal is when your antenna is pointed directly at the model – which is why you fly with the antenna at 90 degrees ( did you know that ? )

If you have a telemetry enabled receiver ( a RX battery voltage display is a good indicator ) then you can get the Taranis to display the strength of the telemetry signal from the RX to the TX. This is known as the RX RSSI.

If you stand with the antenna pointed straight out and slowly rotate 360 degrees then when the signal is at its lowest you are facing directly towards or directly away from your model ( slight rub there ).

The screen below shows the default RX RSSI

2015-11-27_20-31-44


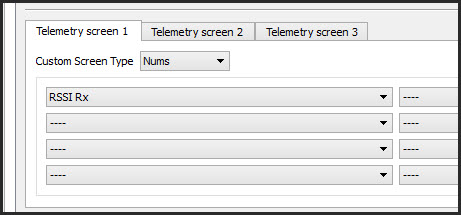
You can add a more useful RSSI reading to the telemetry screen using Companion as shown below

2015-11-27_20-32-35

2015-11-27_20-32-59

As you get closer to the model you may need to enable range check mode to reduce the signal strength to see a discernible difference. In this case it is the RSSI in the pop up window that you use to gauge the signal strength.

2015-11-27_20-57-09

This method also works on other Telementry enabled transmitters. I helped a club mate with a very posh Jeti transmitter to find a model last week but the Jeti has 3 4 antenna built into the handle so the directional aspect was not as good. He did find the model by walking around until the signal peaked and then going to range check mode to narrow it down further.

Guest Post : Marc Merlin : Taranis 6 channel with throttle and crow combined on one stick.

Marc Merlin contacted me with his modified config a the 6 channel motor glider asking if I would post it here. His post is below :

I owe huge thanks to Sean Cull for posting his detailed configuration here:
http://seancull.co.uk/2014/07/07/v2-frsky-taranis-6-channel-configuration-eepe-with-trainer-flaps-crow-spoilers-reflex-and-instructions/
I encourage you to go look at his detailed explanations if mine seem too short. While they don’t apply to my model config, he explains very nicely how things generally work, and this is where I learned most of what I know about Taranis programming.

I’m sharing my 7 channel glider config because it allows you to setup your flaps asymmetrically where they go down more than up, or only down. You decide how you want to set yours up and you only need to change the subtrim in channels 6 and 7, something that was very non obvious to me when I was learning how to program my Taranis.

My setup is also different from Sean’s by having the throttle stick control crow flaps from 0 to 45%, nothing from 45 and 55%, and then throttle from 55% to 100%. This allows you to use a single power lever to slow down from gliding, or add power to gliding, middle being neutral. No switches to flip to switch from crow flaps to motor power, which is very handy if you have to cancel your landing as the last second.

You can read more about it and get the config files here:
http://marc.merlins.org/perso/rc/post_2015-05-17_Cularis-7-Channel-Glider-With-Crow-Flaps-and-Washout-Taranis-Config-EEPE.html


Why won’t my Taranis bind and the saga of EU Firmware ETSI EN 300 328 V1.8.1

taranis

The EU has introduced an improved standard covering R/C transmitters called ETSI EN 300 328 V1.8.1 . This came into effect on the 1/1/2015 although there was quite a lot of warning in advance.

This change has a new constraint that a Tx that has just been turned on must first listen to any frequency before it broadcasts on that frequency. This helps to determine if the frequency is in use by another person – this seems quite sensible and makes the frequency management more robust. This is known as Listen Before Talking ( LBT ) and is in section 4.3.1.3.3.

The internal Taranis transmitter module ( not the OpenTx part ) did not comply and FRSky issued a firmware update at pretty much the last minute. Legally this is only required for new Transmitters sold after 1/1/2015.

But here is the rub : A Transmitter working in D16 mode ( the mode required for telemetry ) can only work with receivers that are using the same firmware.

So a pre 2015 EU Tx will not work in D16 mode with a shiny new receiver and vice versa. The quite useful chart below is floating about ( Kunde means user up-gradable ).

Note that it is not clear at this time if receivers and transmitters sold outside of the EU will have the “2014” or “2015/ EU” firmware – so if you have a pre 2015 Tx you may be able to buy receivers from outside of the EU to keep everything “Non EU”

2015-03-10_21-11-44

So … if you want to use D16 mode ( more later ) and you want to buy more receivers you need to have ALL of  your receivers and Txs either using the EU firmware or not using the EU firmware – but they must all be the same.

I choose to upgrade my Tx and Receivers. You need to purchase 2 cables and then make adapters. For the Tx the process is described here. For the receiver the smaller X4R receivers need a molex adapter ( the cable was in the packet ) but the X8R receivers do not.

https://www.t9hobbysport.com/frsky-smart-port-adapter-cable

https://www.t9hobbysport.com/frusb-3-upgrade-cable-for-sensor-hub-modules-receivers

My article on the X4R upgrade

Once you have made the adapters the process is not too bad. There is also work in hand by the amazing OpenTx Community to allow the Tx to be upgraded via OpenTx Companion – this is possibly in version 2.016. This will also allow the Receivers to be upgraded from a wired connection tot he Tx which will be useful for people without a Windows PC ( not sure how Mac users are affected ).

So if you are in the EU what are your options are :

=> Don’t but any new receivers and life is fine

=> Use D8 instead of D16 if you do not need telemetry ( including battery indication ? ). You may also loose the ability to bind a profile to only one receiver ( can anyone clarify ?)

=> Downgrade any new receivers to the 2014 firmware

=> Only buy receivers from outside of the EU ( not 100% sure on this being a fact )

=> Upgrade everything to the 2015 firmware.

A couple of last points :

1) make sure you get the latest 2015 firmware. The is the original 2015 firmware and there is a “bug fixed” version – I think it is highly irresponsible of FRSky to continue to allow the buggy software to be downloaded.

2) remember to reset your fail-safes after flashing the firmware – even if they are configured via the TX.

Please let me know if any of this needs improvement

Sean


Quick note on updating the Firmware on a FrSky X4R Receiver

downloadThere is a good thread here – http://www.modelflying.co.uk/forums/postings.asp?th=104775&p=2

The 4 things I would add are :

1) do not power your receiver from a battery. It will get power via the USB cable.

2) you will need to make an adapter using the small molex (?) plug supplied when you bought the receiver. Use the yellow, red and black cables.

3) The software tool you need is a pig to find. Look for the “Upgrade Lite-S.Port Telemetry” under Download > Tools

4) Be careful – there seems to be both the original EU firmware and a “bug fixed” version of the firmware on the site.

Note : you will need to re-activate your failsafes again after flashing the firmware – even if you configured them via the Tx or OpenTx Companion.

Hope that this helps, Sean

Aileron Differential / Adverse Yaw and a touch too much cleverness – Hard Lesson Learned and

phoenix


Update – while everything below still stands the cause of the problem was worse than I thought. In introducing a curve for the aileron differential I had reversed the servos to make it work BUT I had not tested “basic or panic” mode afterwards – and so the aileron controls were reversed in that flight mode – which is kind of ironic. This has made me even more convinced that a basic / panic mode with no mixes is not necessarily a good idea or needs to be done and (re)tested with as much care as the other modes.

I read an excellent article in the BMFA journal ( issue 121 , unfortunately not on-line ) about Aileron Differential / Adverse Yaw but unfortunately never got around to doing much about it until this week. Essentially this is where symmetrical deflection of the ailerons causes too much drag on the lower aileron – just like dropping a flap on one side of the model only.

Last week when I set up my new Hobbyking Phoenix 2000 ( review coming soon )  with quite large aileron throws so that I could use crow braking / spoilers. When I looked at the amount of downward deflection of the ailerons it was very significant and alarm bells rang in my head. I used curves on the Taranis to reduce the downward deflection to 40% and this seemed to work really well.

curve5

In my Taranis setups I usually have a basic mode with no mixes as a fallback in case I have programmed something wrong. I have always been quite proud of this feature – until today.

As I circled around for landing I accidently knocked the switch into this basic mode. I wasn’t too worried as it was a simple landing and I didn’t need engine or braking. Unfortunately during the slow turn the model stalled, dropped a wing and dived into the long grass.

What had happened was that the 40% limit on the downward aileron deflection had been removed and the excessive downward deflection on the inside wing during the turn had created so much drag that the wing had stalled.

Thinking back to my first slope session a couple of weeks ago when a crashed another plane the symptoms were very very similar.

So the lessons learned :

1) aileron differential is very important

2) you can be too clever when programming transmitters sometimes

I will update the 6 channel Taranis eepe this week

V2 FRSky Taranis 6 Channel Configuration eepe with trainer, flaps, crow spoilers, reflex and instructions

Update – see this important article on Adverse Yaw. I hope to add this feature soon.

markedup v2

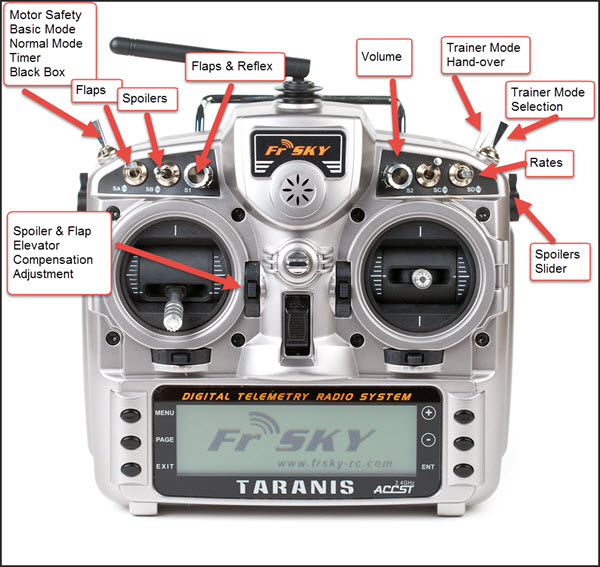
Here is version 2 of my 6 Taranis Channel setup for planes such as the Bixler. New additions include volume control, black box recording ( telemetry, switches and sticks ) and a timer.

This file is strictly for OpenTX 2.x and will not work for OpenTX 1.x

Files => eepe file and instructions

I have had my FRSky Taranis for a few months now and am loving the software side of it. My son has a 6 servo bixler and I have set up a configuration on the Taranis to support trainer ( buddy ), flaps, Crow Spoilers and Reflex – mostly just to experiment. You can download the eepe file, the sounds and the instruction pdf below. I will probably blog various sections too.  The latest version ( what ever that currently is ) can be found here => http://www.seancull.co.uk/taranis  The key features I wanted were :

  • A Motor Safety Switch
  • A trainer function so that I could connect the Taranis to another buddy box via a buddy / trainer lead. I wanted to have two modes – a partial mode where I retained throttle control and a full mode where I could pass across all 4 primary functions.
  • High, Medium and Low Rates with Expo
  • Rudder and Aileron mixing to smooth out turns
  • Flaps with elevator compensation
  • Spoilers / Air Brakes / Opposing Ailerons and Flaps or Crow as the glider folks call it. Also requiring elevator compensation
  • Reflex – positioning the flaps in a slightly up position – supposedly makes for more speed – I just like experimenting
  • A basic “panic mode” that removes all mixes
  • Dangerous functions such as flaps or spoilers should have repeating warnings to remind you they are active.
  • Occasional functions should have a once off voice alert to remind you what they are – e.g. the partial trainer mode selection.
  • Timer
  • Volume Control

If you are specifically after an F3 glider set up see Mike Shellims Configuration

Taranis / OpenTx 2.x – the difference between raw stick values and Inputs for rates

A quick note on something I have just realised.

When you look at the mixes screen in OpenTX 2.0 there are now options in the mixes to use Ail or [I4] Ail ( the number may vary )

These are VERY different.

[I4]Ail is the aileron stick value after the rate lines have been applied.

Ail is the raw stick value. If you use Ail then your Rates Switch will not make any difference – you will always be on Full Rates. So check these settings carefully when you upgrade or if you upload eepe files from other people.

There is a useful forum post here

raw

Taranis Smart Trainer Mode using Sticky Switches in OpenTX2.x

Note : this scheme has the instructor using the buddy box
balancebar

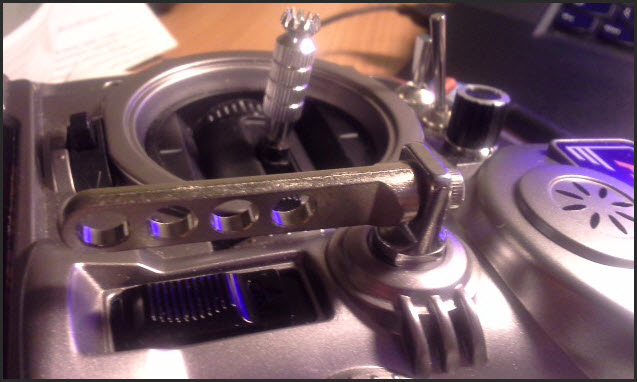
A better Tx with a better Balance Bar

My son is still struggling to get good control of his plane and I reckon it is partly to do with his old buddy box which has poor sticks and no balance bar.

I thought I would make the Taranis the student transmitter and the old 35Mhz Futaba buddy box the instructor “transmitter” – but the Taranis will be transmitting.

I also wanted to be able control the handover from the buddy box and to be able to put my instructor Tx on the ground unattended to hand launch my son’s plane.

Refer to this article about the basics of Taranis and buddy box / trainer mode

OpenTX 2.x and TR1 – 16

This can now be done with OpenTX 2.x because the buddy box / trainer is always transmitting signals TR1 – 16 to the Taranis even if the switch controlling the student transfer is not active – this in effect means that a buddy box switch can be used to control the hand off from instructor to student => the instructor can use the buddy box.

Smart Trainer Switch ( sort of )

I initially tried using the channel 5 switch on TR5 and this worked well but I wanted to try something along the lines of the “Smart Trainer Switch”. This forum post scheme is to transfer control to the instructor when there is a difference in the inputs between the student and instructor. This would allow the instructor to “follow along” with the student but in my ( fairly limited ) experience there will almost always be a difference – for example the instructor may use rudder input whereas the student probably won’t.

So I settled for a scheme where a significant input of the elevator, aileron or rudder will transfer control to the Instructor and it will remain with them until switch 5 on the buddy box is cycled.

Sticky Switch

One of the new features in OpenTX2.x ( maybe 1.9x ) is the Sticky Switch. This is a Logical Switch which is latched into position by one action and then unlatched by a different action. In the example below moving to SA↑ latches the switch and moving to SB↑ will unlatch it. The latching action will last for 3 seconds and will only start 4 seconds after SA entered the SA↑ state.

No latching will take place unless switch SC is in the SC- position

sticky2

Note that the sticky switch is set by the transition of the trigger and release values into the required state. So for example if SA↑ is left in place and SB↑ is applied then the latch will be reset and SA↑ needs to be removed and re-applied before the latch will set again.

The Scheme

Step 1

Add TR1,2, 4 ( your channels may vary ) to a new virtual channel as shown below. These represent the trainer elevator, aileron and rudder. The throttle is deliberately left out of the equation. Using a channel like this means you can just use one formula to detect stick movement.

In my case Channel 14 now represents an indication of how far the instructor sticks  ( in my case on the buddy box ) are away from their centres.

2014-06-30_23-28-28

In my case I only want this feature to work in “Normal Flight Mode”

Step 2

There is no option to use the TR5 signal in the logical switches so it must be mapped to a channel that can in turn be referred to. In my case I am using channel 13

2014-06-30_23-30-35


Step 3

2014-06-30_23-36-16

Create a Logical Switch ( L9 for me ) that detects movement by the instructor. I selected a value of 25% as all 3 axis are added together and you may have some trim in. Its a matter of trail and error. I also only want this to be active with SG↑ as I use SG to determine the trainer mode I am using.

Then create a Logical Switch ( L10 ) that detects that the TR5 switch ( Channel 13 for me ) has been cycled. In my case it is either +100% or -100% so I used < 10% as a trigger.

Finally create a Sticky Logical Switch that is set by L9 ( Instructor movement ) and reset by L10 ( TR5 switch cycling )

The Result

If the instructor moves their sticks in “Normal Mode” with SG↑ then they get control. If they cycle switch 5 on the buddy box with the sticks centred then control reverts to the student using the Taranis

I was a bit worried that if the buddy lead as pulled out you could be left with no control but it seems to revert back to the Taranis. You should test this for yourself.
 

Configuring the Taranis Trainer / Buddy Box Functionality

both

I use an old 35 Mhz Futaba SkySport 6 as a buddy box for the Taranis. It works really well and with OpenTx 2.x you can now also pass through more than 4 channels for things like the flaps.

Initially I used a Phoenix Simulator adapter but just recently I have soldered the buddy lead directly into the Futaba for better reliability. I would recommend using the simple JR lead rather than a stereo lead but opinions on the web seem to vary.

The Basic Concept

The basic concept is simple. The buddy box passes a copy of the output signal to the Taranis via a simple 2 core trainer cable ( that bit surprised me ). The Taranis sees these inputs as Input Channels 1 – 4 ( and more in OpenTx 2.x – see later ).

The inputs can be calibrated and scaled / multiplied. Each of the inputs is mapped to a stick and the mapping can include a weighting e.g. 125% and whether the signal is absolute ( no master input when the student is in control ) or additive where the master and the trainer signals are added together and the resulting sum applied to the model. The second option sounds very clever but having thought about it doesn’t really seem that useful.

Up Front Decisions

Before you start you need to decide on some basic things :

  • If your buddy box has dual rates will you use these with your student or will you use the dual rates on the master ( Taranis ) for both instructor and student ? I prefer to just use the Taranis rates as it is one less switch to check. If you do this then remember to disable the dual rates on the buddy box.
  • You can configure the Taranis to take all of the flight control inputs from the buddy box or just some of them. My Bixler setup has a switch that in one case gives the student full control and in another leaves me with the throttle control.
  • How do you want to hand control across to the student ? I would highly  recommend the spring loaded switch SH but you could use one of the other switches.
  • I would highly recommend a master engine safety be configured as it is very easy to hand control to the student when they have inadvertently added throttle whilst the model is on the ground. A master switch will protect from both Student and instructor inadvertent throttle movements in the pits.

Step 1 – Connect the buddy box

Connect the buddy box to the Taranis via the lead and switch it on

Step 2 – Navigate to the TRAINER menu

Continue reading

FRSky Taranis 6 Channel Configuration eepe with trainer, flaps, crow spoilers, reflex and instructions

Guide to Taranis "Bixler" 6 Channel

This has been superseded

I have had my FRSky Taranis for a few months now and am loving the software side of it. My son has a 6 servo bixler and I have set up a configuration on the Taranis to support trainer ( buddy ), flaps, Crow Spoilers and Reflex – mostly just to experiment.

You can download the eepe file, the sounds and the instruction pdf below. I will be updating it as I go along – probably to OpenTX version 2 very shortly. I will probably blog various sections too.

This version of the PDF > Bixler_6_Servo_Guide_pub_140607

This version of the eepe and sounds => Everyting_Bixler_6_Servo_Guide_pub_140607

The latest version ( what ever that currently is ) can be found here => http://www.seancull.co.uk/taranis 

The key features I wanted were :

  • A Motor Safety Switch
  • A trainer function so that I could connect the Taranis to another buddy box via a buddy / trainer lead. I wanted to have two modes – a partial mode where I retained throttle control and a full mode where I could pass across all 4 primary functions.
  • High, Medium and Low Rates with Expo
  • Rudder and Aileron mixing to smooth out turns
  • Flaps with elevator compensation
  • Spoilers / Air Brakes / Opposing Ailerons and Flaps or Crow as the glider folks call it. Also requiring elevator compensation
  • Reflex – positioning the flaps in a slightly up position – supposedly makes for more speed – I just like experimenting
  • A basic “panic mode” that removes all mixes
  • Dangerous functions such as flaps or spoilers should have repeating warnings to remind you they are active.
  • Occasional functions should have a once off voice alert to remind you what they are – e.g. the partial trainer mode selection.