
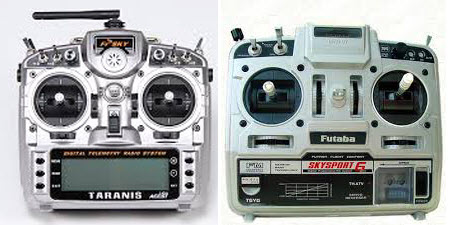
I use an old 35 Mhz Futaba SkySport 6 as a buddy box for the Taranis. It works really well and with OpenTx 2.x you can now also pass through more than 4 channels for things like the flaps.
Initially I used a Phoenix Simulator adapter but just recently I have soldered the buddy lead directly into the Futaba for better reliability. I would recommend using the simple JR lead rather than a stereo lead but opinions on the web seem to vary.
The Basic Concept
The basic concept is simple. The buddy box passes a copy of the output signal to the Taranis via a simple 2 core trainer cable ( that bit surprised me ). The Taranis sees these inputs as Input Channels 1 – 4 ( and more in OpenTx 2.x – see later ).
The inputs can be calibrated and scaled / multiplied. Each of the inputs is mapped to a stick and the mapping can include a weighting e.g. 125% and whether the signal is absolute ( no master input when the student is in control ) or additive where the master and the trainer signals are added together and the resulting sum applied to the model. The second option sounds very clever but having thought about it doesn’t really seem that useful.
Up Front Decisions
Before you start you need to decide on some basic things :
- If your buddy box has dual rates will you use these with your student or will you use the dual rates on the master ( Taranis ) for both instructor and student ? I prefer to just use the Taranis rates as it is one less switch to check. If you do this then remember to disable the dual rates on the buddy box.
- You can configure the Taranis to take all of the flight control inputs from the buddy box or just some of them. My Bixler setup has a switch that in one case gives the student full control and in another leaves me with the throttle control.
- How do you want to hand control across to the student ? I would highly recommend the spring loaded switch SH but you could use one of the other switches.
- I would highly recommend a master engine safety be configured as it is very easy to hand control to the student when they have inadvertently added throttle whilst the model is on the ground. A master switch will protect from both Student and instructor inadvertent throttle movements in the pits.
Step 1 – Connect the buddy box
Connect the buddy box to the Taranis via the lead and switch it on
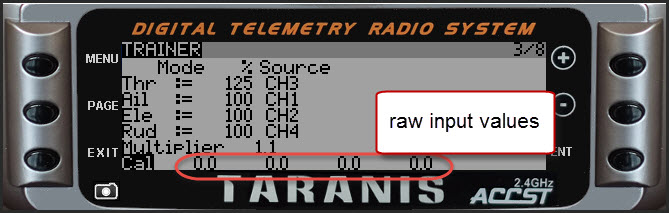
Step 2 – Navigate to the TRAINER menu
I do this by a long press of the MENU button until the RADIO SETUP menu and then pressing PAGE twice.
This screen shows you the actual raw inputs from the buddy box even if no other functionality is configured.
Step 3 – Check movement
Check that moving the sticks on the buddy box does actually change the input values. If the values do not change then nothing is going to work. Don’t worry about the actual values, just that they change by at least 30% +
Note that you will need to use a different method to check the additional switches later.
Step 4 – Map the buddy box sticks to the correct channels.
You can tell which channel on your buddy box is which by moving the sticks and noting which of the input values changes at the bottom of the screen. If you move the throttle and the third set of digits change then your throttle is being seen as channel 3.
In my case Taranis sees the buddy box throttle input as channel 3 as shown below. For each of the sticks you need to modify the channel setting to match the MASTER stick description on the left. Navigate to the SOURCE column and then press ENT to change the values as required.

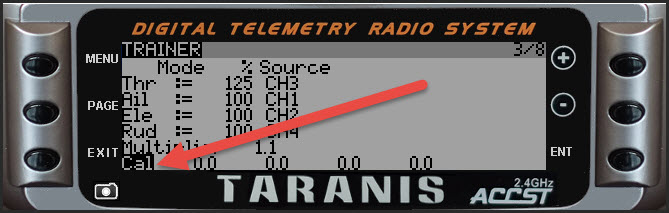
Step 5 – Calibrate the stick Centres
Centre the sticks and trims on the buddy box (including the throttle as best you can ) and then navigate to “Cal” and press enter. The input values at the bottom of the screen should read 0.0 or close.
Step 6 – Check the weighting
Before you do anything make sure that there are no Dual Rates or Throttle mixes selected on the buddy box. You can check this by observing the input values as you change the dual rate settings on the buddy box.
Next try moving all of the sticks and checking what the maximum and minimum values on the input values are. In my case the elevator, aileron and rudder produced -90 to + 90. I then increased the “Multiplier” to 1.1 to increase these values to almost -100% to +100%.

Despite checking everything I could only get the throttle to register -75% to +75% so I made the throttle weighting 125% as shown below. This does NOT change the input values so you will find it easier to make this adjustment once you have made some further settings that actually map the buddy box trainers onto the actual channels in the model.
As described above I always choose the “:=” setting which means that when the student is in control the master transmitter has no impact on that channel.
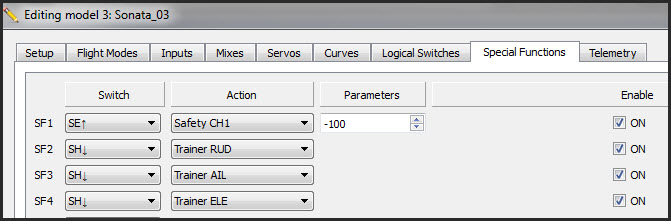
Step 7 – Configure a Handover Switch
You need to use a Special Function ( Custom Function in OpenTX 1.x ) to map the handover switch. In the example below spring loaded switch SH will activate full trainer mode when it is held up. The screenshots below are from the OpenTX Companion software which is much easier than using the transmitter menus for this.

You can choose to only hand across certain functions instead, in this case the instructor retains the throttle control. My 6 Channel Bixler configuration uses switch SG to determine if the spring loaded switch will hand across all functions or retain throttle control.
This is the same functionality on the transmitter menus. You can access then menu fromt he start screen by pressing Menu > Page x ten times ( or menu and “long page” x 3 times )
Step 8 – Test throws and servo direction
You can now test the buddy box. I would recommend doing this using the CHANNEL MONITOR screen below and a real model. You access the CHANNEL MONITOR screen by pressing the page button 3 times from the start menu.
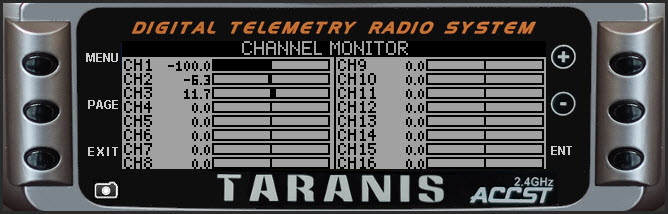
As you move the sticks on the master transmitter you will see the channels move. Pull the spring loaded switch and you should see the buddy box move the controls in the same way.
Take special note to check that the direction of the movement is the same. If it is not then use the servo reversing switch on the BUDDY BOX to resolve the issue.
Also check that the throws do in fact go to +100% and -100% or at least close to them.
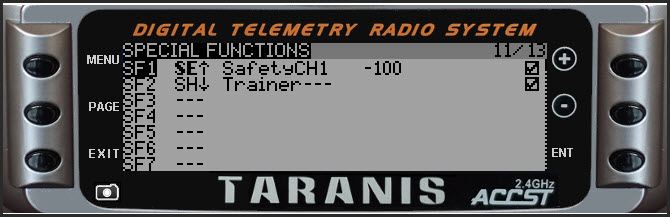
Step 9 – Add a master safety switch for the motor
I configure switch SE as shown below so that the motor is only armed when the switch is in the up position. This applies to both instructor and student. The configuration is shown in the images above.

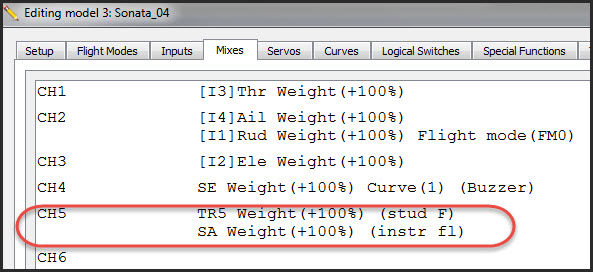
Step 10 – Additional Channels ( OpenTX 2.x only )
In OpenTX 2.x up to 16 trainer channels can be mapped from the buddy box. These are referred to as TR1 – TR16 in the mixes. The image below shows how you can map both trainer channel 5 and instructor channel 5 for the flaps
CAUTION : the TR1 – TR 16 inputs are ALWAYS active. They are NOT interrupted by the spring loaded switch. So in the case below the buddy box and the master signals are additive.
Additional Resources
Youtube
https://www.youtube.com/watch?v=jveuNgWsdWk
OpenTX Manual
https://docs.google.com/document/d/1qlh09LzxtpPt7j_aqG8yiOu2yoYMzP9XA-PJA81rDJQ/pub#h.tazqjo725cfp
Pingback: Taranis Smart Trainer Mode using Stick Switches in OpenTX2.x | Sean Cull
Great blog, found this article very helpful in confirming how to set this up. Cheers! Mat.
HI, Sean,
I am having some problems with my Taranis, to set up the trainer functionality. Because it happened to me before, the reason my be fw version. I have in my tx 2.0.13. Can you tell me which version did you use for the example, or any version that you know this configuration works? I even loaded your eepe file, and could not make it work. I also used the same cable set up you used (mono cable plus futaba adaptor). I used both, a Futaba buddy box and a 6XE transmitter.
Richard, I can’t speak to 2.0.13 and a trainer hookup but I can tell you that 2.0.15 works. I had my Taranis Plus running 2 days ago with a friend’s transmitter.
Great help thanks. I needed something more elaborate than the basic trainer set up, so used your tip to add a TR mix. For info, the TR inputs do not have to be always active, as you suggest above. You can simply assign another spare switch to activate and de-activate the mix and use the Multpx setting to decide if you want the slave to replace, multiply or add to the master input. ( I’m using v2.0.12)
Hi, I can’t get the Trainer channels TR9 thru TR16 to work at all. TR1 thru TR8 are working fine.
I tried to update the Taranis to the newest firmware 2.1.8 but no luck TR9 and above are not working.
I came to your blog in researching the possibility of creating a buddy box with a Taranis QX7 as master and a Flysky i6x as slave. I was under the impression that both master and slave transmitters have to be running Open TX, if the Taranis is in the mix. Am I wrong?
Hi. very nice the post, but i have a question I need more than 4 channels in the trainer Page, how i can do that?? Is the only way to finish my project.
Thanks